Another cruise on the Motor Vessel David B.
Twitter is my social media platform of choice and I follow so few people there because I actually try to read everything they tweet. That’s how I learned about the four-day photography cruise in the San Juan Islands on the Motor Vessel David B and the 50% discount they were offering to fill empty cabins.

Here’s a photo of the David B at anchor on the last day of our trip.
I’d taken a 12-day cruise on the David B from Bellingham, WA to Ketchikan, AK back in April/May of this year. (I started to blog about it in some detail and put that aside. Sorry.) I knew all about the boat and what I could expect on board. Cruising on a small ship isn’t cheap and I honestly didn’t expect to be on the David B again. But 50% off made the four-day trip quite a deal. I put it to my Twitter friends — should I or shouldn’t I? — and was overwhelmingly told to go for it.
So I juggled some other responsibilities that weekend, booked my spot, arranged for my usual house sitter (who, on arrival, seemed a little too excited about my new TV), charged up the battery in my 2003 Honda S2000 (long story there), and packed for the trip. At 5 AM on Thursday morning, I loaded two carryon sized wheelie bags — one with clothes and the bigger one with camera equipment — into the trunk of the Honda and started on my way.
Getting There
The David B lives in Bellingham when it isn’t summering in Alaska. Bellingham is about four hours from my home. Boarding time was at 9 AM and I wanted to maximize my time on board. That’s the only reason I set off in the dark — I absolutely detest driving on unfamiliar roads at night.
After a quick stop at a Starbucks drive thru for one of their bacon and egg sandwiches (I had my own coffee in a travel mug) and another stop for gas in Leavenworth, I began the climb up into the mountains on Route 2. That’s right about the time the rain started. Great. Not only was I driving in the dark, but I was doing it in the rain.
Fortunately, I seemed to be one of very few people on the road. As the rain came down, cleaning all the garage and road dust off my car and reminding me again that I needed new wiper blades, I made the best pace I could without scaring myself. The car performed admirably — it always does — but it was still a relief to be on the other side of Stevens Pass in the valley beyond.
I stopped at the Sultan Bakery primarily to use their bathroom, but I also bought a nice cinnamon bun with no icing. I ate that in the car and kept driving. It was light by this point, but a dreary day with a heavy overcast. I wondered whether the whole weekend would be like that.
I arrived at Gate 5 of Bellingham’s Squalicum Harbor at about 9:05 AM. A short while later, I was wheeling my two bags up to the David B. On board, it was hugs for Christine and Jeffrey, the boat’s owners/captains. Jeffrey led me downstairs and, surprisingly, put me in the same cabin I’d had that spring. It felt like coming home.

My cabin on the David B consisted of a comfy queen sized bed, space to stand/dress, and a tiny head (bathroom) with toilet and sink. I had the luxury of two portholes: one in the sleeping area and one in the head. There was only one shower on board and that was in a spacious shared head at the forward end of the cabin area.
My Fellow Passengers
Back upstairs, the other passengers had arrived and were settling in. There was Betsy from Port Townsend, who had also taken advantage of the last minute half-price offer. Then there were Jeffrey and Jane, from Oregon; Jeffrey — I’ll call him Jeff from this point on so we don’t confuse him with Captain Jeffrey — was the photographer. Al and John were the photographers leading the trip; Ilene was Al’s wife. The David B only has four passenger cabins so that meant John would be sleeping upstairs in the saloon.
Interestingly, we were all about the same age — mid 50s to mid 60s. We immediately hit it off. Our first lunch together, after getting underway, was a parry among passengers quoting lines from The Princess Bride. Lots of laughter. I soon realized that I was among brainy people who, for the most part, were up on current events. I was also very pleased when I realized that we were all on the same page politically. Conversations at meals got deep, especially on the last night when we talked a little about climate change and what to do about it.
Day 1
The weather cleared while we were settling in, with blue sky peeking out behind low, drifting clouds. The forecast called for a gale warning, but we saw no sign of that. The wind was relatively calm and the sea was smooth.

I shot this off the stern of the David B while we were still in the slip. It was turning into a beautiful day.
We started out between 10 and 11 AM on that first day. It was great to hear that old 3-cylinder engine’s familiar rhythmic beat! After squeezing out of the slip — a feat I was amazed by — Jeffrey took us out across Bellingham Bay and around the south end of Lummi Island. I had my nautical charting app running on my iPad with the tracking feature turned on, but it soon failed to track — I had neglected to delete tracks from my previous cruise and the app’s memory was full. Further confusing the matter was that Al and John did a little lecture enroute. That required them to darken the salon so they could use a projector and screen. With the windows curtained, it was impossible to track our progress through the islands.
The lecture was an introduction to photography with a concentration on themes, composition, and what makes a photo work. John showed some of his photos — mostly landscapes from Alaska and the American southwest — and Al showed some of his — mostly black and white images that showcased textures and patterns.
Somewhere along the way — it might not have been that first lecture — Al introduced Adobe Lightroom, which we were required to have installed on our laptops — and explained the benefits of shooting in RAW format (as opposed to JPEG). We all made sure we had RAW format enabled on our cameras; I set up mine to save RAW on one SD card and JPEG on the other.

The nautical chart for the Sucia Islands. The yellow dot marks where we dropped anchor.
We reached our destination early afternoon: Sucia Islands. Jeffrey steered us into Echo Bay and then into the narrow channel between Sucia Island and Justice Island, right near the gap between Justice and South Finger Island. Christine dropped the anchor. There were a few other boats in the area — mostly in Echo Bay — and a small cruise ship was parked just on the other side of the gap between Justice and South Finger. Jeffrey told us it was on the last day of its cruise from Alaska to Seattle and would likely leave during the night.
We gathered our gear together while Christine and Jeffrey lowered the skiff. Laden with camera bags and tripods, we climbed on board and donned life jackets for the short ride. Jeffrey took us over to the little bay on the northeast end of Sucia Island, right where Ewing Island and some other tiny islands make a shallow, sheltered bay. He landed us there and we all climbed out onto the gravel beach.
We started off as a group, but soon split up to wander on our own. Sucia is a park and is covered with trails that wind through dense forest of conifers and madrone trees. The madrone were fascinating, reminding me a lot of the manzanita I knew from northern Arizona. Their red peeling bark was very photogenic and I got more than a few shots.

The bark peeling off a madrone limb, which was growing at an odd angle on Sucia Island.
I got into a little bit of trouble for not using my tripod on every shot, but when Al and John realized that I’d prefer to make my own mistakes and learn from them (if I was making a mistake at all), they didn’t bother me about it. I did drag my tripod along on every shoot that weekend except the last and I used it for about a third of the photos I took when we were on land. (I plan to blog a bit more about tripods soon.)

A great blue heron perched in a conifer.
One of the oddest things I saw (and photographed) was a great blue heron perched on a conifer near the beach where we’d landed. He stayed almost perfectly still for at least 30 minutes and all of us got photos of him. I think Christine’s came out the best; she had a lens able to get in really close and capture a lot more feather detail than I could with mine.
After 90 minutes or more, we gathered together on the gravel beach for Jeffrey’s return on the skiff. From there, we cruised along the south shore of Ewing Island, which is just covered with amazing tafoni formations. The water was relatively smooth and Jeffrey was able to get quite close. With my 75mm to 300mm zoom lens and a 1/1000 shutter speed, I had no trouble capturing full frame shots of the rock formations. Best of all, the late afternoon light deepened shadows and enhanced colors. Since texture is one of the themes I like to explore in my photography, I was in heaven. So were Al and John, who apparently had never had the opportunity to spend so much time in this area. For close to an hour, the skiff was full of the sound of shutter clicks and photographer oohs and aahs.
Contrast was one of the themes suggested by Al and John. This is sandstone with tafoni formations in the lower right corner.
Here’s a closeup shot of some tafoni. I’m pretty sure I shot this one at my feet while I was still on Sucia Island.

What struck me about this was the back lighting and silhouette. Lightroom brought out a lot of detail in the bird, but also put a halo around its body which required more work to remove.
I didn’t just shoot rocks as we inched along the shoreline. There were also birds — mostly gulls — and distant views of Mount Baker’s snow-covered top. My shutter clicked.
These birds seemed to pose for a photo. Although I think the composition and mechanics are fine, I’m disappointed by the lack of contrast. I wish the birds were white so they’d stand out more.

The view in this shot was stunning, but it took a lot of work in Lightroom to get it to look this good. Even so, I wish I could do better.
Back on the boat, we got our first Lightroom lesson. The goal was to get the raw images off our SD cards and into our laptops in a Lightroom catalog. I also took the opportunity to back up all of my photos onto one of my photo hard disks, which I’d brought along just for that purpose. Al and John then showed us how to use a lot of the controls in the Basic panel of the Develop module. (Pardon me if I’m getting these terms wrong, but it’s not like I’m writing a book about them.) They encouraged us to ask them for help making any fixes we needed as we worked on images. The goal was to have three images to share for a critique after dinner.
Of course, none of us followed the three image rule. Jeff was the worst, with 11. I submitted the seven you see above plus the other one below for a total of eight, and Betsy submitted five. Oops. Al and John projected them onto the screen and critiqued them, suggesting things like bringing out detail in one spot or toning down the brightness in another or changing the crop. All helpful bits of feedback.
Here’s the eighth photo I submitted. I really do like capturing textures. This was a log lying along the beach.
Dinner was amazing (as usual on the David B). We had pork tenderloin with mashed potatoes and veggies. I’d brought along a pint sized jar of either homemade mango or cherry chutney — I can’t tell the difference because I made the cherry chutney with yellow rainiers — to go with the pork and it got raves. We ate almost all of it. After chatting for a while in the saloon, we all retired for the night.
I slept like the dead, likely exhausted from a combination of my early start, the stressful drive, and the activity on shore.
Day 2
In the morning, the little cruise ship was gone. It was a beautiful morning.
I tried to launch my drone but it wouldn’t fly. Apparently I was in some sort of restricted area — possibly the park? I was disappointed and didn’t try again.
We had breakfast: spinach frittata, yogurt, granola, sausage, and blueberry muffins. (The David B is not a boat for dieters.) Then we had another Lightroom lesson and planned our next photo outing.
The plan was to stay right where we were for the day. We’d go onshore at Echo Bay and could walk anywhere on the island. Christine wanted to show us what she called the sunken forest — a place where trees that had grown in a low-lying area had been killed off, likely from the invasion of salt water. There was also Fossil Bay (where there were fossils) and China Caves (which were cavelike formations). The entire island was heavily wooded, but there were plenty of trails, some of which were wide enough for the ranger who lived there to get around on a six-wheeled Gator.
By the time we got onshore, the weather had changed. Clouds were moving in and it looked like we might get rain. The group stayed together for a while, crossing the island at the narrow point we’d landed at and then following a trail to the sunken forest. There was a very large school group on the island and we must have passed about 30 kids ranging in age from 5 to 12 going the other way. There were adults, too; one of them was a woman carrying two babies. I took some photos around the sunken forest and didn’t like anything I shot. Betsy wanted to check out the fossils so I went with her.
It started to rain just as we began walking. At first, I thought the thick forest canopy would keep us dry, but soon it was obvious that it wouldn’t. I was glad I’d had the foresight to bring my rain jacket instead of my cotton sweatshirt as my outer layer. Although my jeans were getting wet, I was staying warm and dry up top. The rain became a downpour just as we reached a trail intersection where there were some signs and maps covered by an overhang. Al and Ilene were already in there. We joined them.
Hail outside the shelter I waited in with Al and Ilene.
Betsy didn’t stay long. She wanted to find fossils and took off in the direction of the area where they could be found. The ranger eventually found the rest of us and told us there was a more comfortable shelter a little farther down the trail. We made our way there. It was a big wooden shelter with windows all around and a concrete floor, filled with picnic tables. We’d just gotten inside when the downpour became a torrential downpour and it began to drop pea-sized hail all around us.
Oddly, I didn’t mind the rain. It wasn’t cold and even though my legs were damp, my upper body was warm and dry. I took off my rain jacket and draped it over a table to dry a little and watched the rain come down. Being a desert dweller, I really do enjoy a good rainstorm now and then.
It eventually let up and I headed out in search of Betsy and the fossils. I found her at the head of Fossil Bay, stowing loose day packs and jackets under a picnic table. The school group we’d passed had left everything out to get completely soaked by the rainstorm.
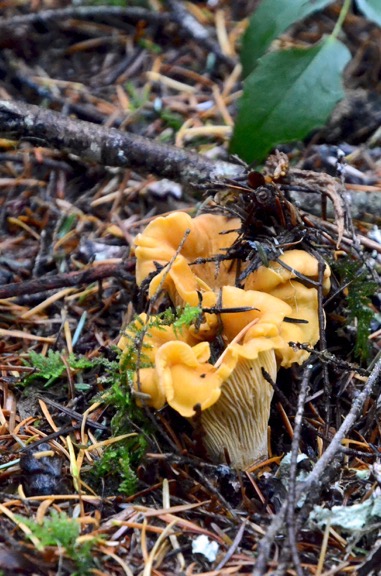
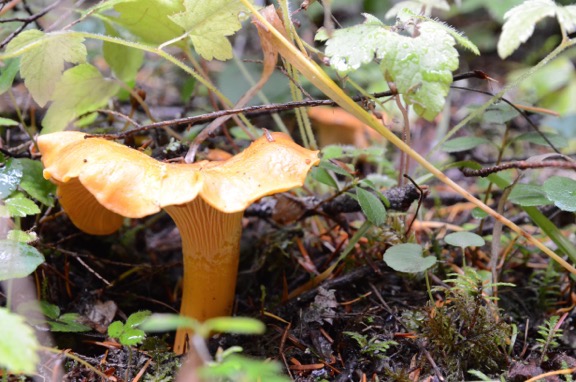
She showed me two fossils she found and together we headed back to where Jeffrey would be picking us up with the skiff. We made only two wrong turns before getting on the right trail. I found a single chanterelle mushroom along the way.
On the way back to the boat I realized that I’d taken very few pictures. Instead, I’d really enjoyed the hike in the dense woods, despite the rain.
We had another Lightroom lesson and then worked on our images for a while. I was really starting to like using Lightroom. I had never really understood the point of it since I’d been using Photoshop for so long. But now I could see that when working with RAW images, it was an excellent non-destructive tool for fine-tuning photographs.
Day 3
We headed away from the Sucia Islands just after breakfast on Saturday. Our destination was Garrison Bay on San Juan Island. Keep in mind that none of these islands were very far from each other, but when you’re cruising at a whopping 6 knots, it takes a while.
Here’s the chart and some of our track (in red) for the trip to Garrison Bay.
One of the highlights of the day’s cruise was a trip up the south shore of Spieden Island. This privately owned island was once the site of a hunting preserve. The original owners had brought in a bunch of miniature deer, bighorn sheep, and other animals and let them loose on the island. When the hunting preserve business failed, the owners abandoned the place, leaving the animals behind. They quickly reproduced with their limited gene pool resulting in some unusual animals. Jeffrey got close enough to see lots of these animals grazing on the grassy slopes of the island or climbing around on the rocks near the shore. I didn’t take any photos but regret it; Betsy got at least a few nice ones.
We saw a pair of bald eagles perched atop Sentinel Rock just as we made the turn inbound toward San Juan Island. We were all out there snapping away. I got a few nice shots, but none of them were good enough to make the cut for the next critique.
Bald eagles on Sentinel Rock. I manipulated this in Lightroom, but never got it as good as I’d like. I eventually gave up.
We were in the middle of another Lightroom lesson with the windows curtained and the screen separating the saloon from the wheelhouse when Jeffrey appeared suddenly and lifted the screen. “There’s a whale outside,” he announced.
You never saw so many middle aged people jump to their feet, grab their cameras, and head outside so quickly.
The whale was a humpback and it was only a few hundred yards away. Two whale watching boats were already with it — at least they were as close as they’re allowed to go. The smaller boat was listing to one side as all of its passengers gathered there.
I soon realized there was a pattern to the whale’s appearances. First there would be a burst of spray as its blowhole reached the surface and it took a breath. Then we’d see its long back and top fin. Then it would disappear for about 10 to 30 seconds. That whole routine happened five to eight times in a row before the dive. That’s when you’d see the whale’s tail emerge from the water as its body headed down to the depths. Once it dove, it would be five to 10 minutes before it appeared again, usually somewhere else.
After shooting too many disappointing pictures of the whale’s back, I decided to focus on getting a shot of the tail. Each time it came back to surface, Jeffrey would try to get closer and we’d all move into position to photograph it. For one round, I put my camera in continuous mode, which enables you to hold down the shutter button and just keep shooting. I soon realized that the size of the RAW image files the camera was creating limited me to about ten shots like that. Every time the whale would reappear after a dive I’d try something else. Once, when Jeffrey just let the boat idle in position on the water, the whale came up right next to us, not even 100 yards away. That’s when I got my best shot: a beautiful view of a barnacled tail dripping with seawater.
Shot with a 300mm lens from the boat, this image is not cropped. In fact, I didn’t need to make many improvements in Lightroom at all.
We watched the whale for about an hour. You can see our track — the red line — in the chart image above. Finally, when it surfaced quite a distance ahead of us back east on the Spieden Channel, we broke off and headed south into Roche Harbor and beyond it to Garrison Bay. The Lightroom lesson finished in the darkened saloon with a discussion of the HDR and panoramic tools.
This was my second time in Garrison Bay, which is right off shore at English Camp on San Juan Island. We’d stopped there on our way from Bellingham to Ketchikan back in April. It was a sheltered cove, which was a good thing because the wind had definitely picked up.
After lunch, we went to shore at English Camp. I’d been there a few years before during a motorcycle trip to Friday Harbor that I’d made with a friend. It looked different from the water side. The history of the place involves a border dispute and a pig. There are a number of surviving buildings, a formal garden fading for winter, and paths leading up to a small cemetery and the top of 650-foot Young Hill.
I got this closeup shot in the formal garden down near the buildings. This is exactly the way the photo came out of my camera — I didn’t make a single adjustment in Lightroom.

This is my favorite photo from the trip. I used my 10mm-28mm zoom lens set to 10mm and mounted the camera on a tripod for a good exposure in the dark forest.
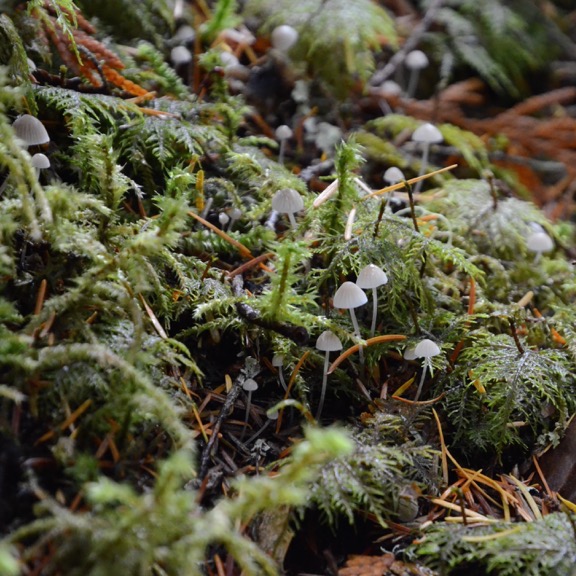
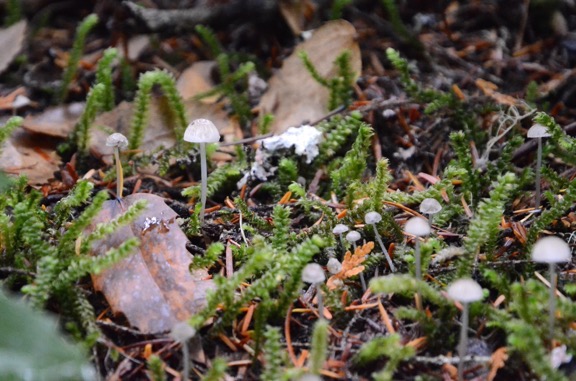
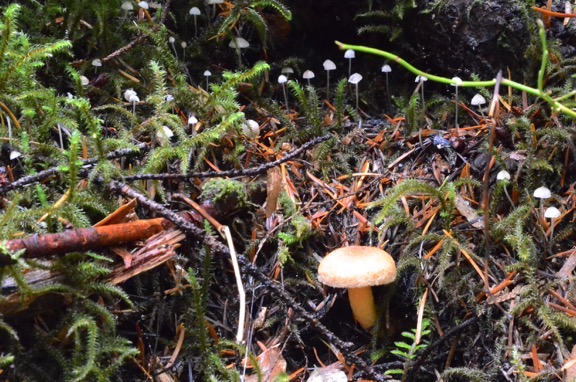
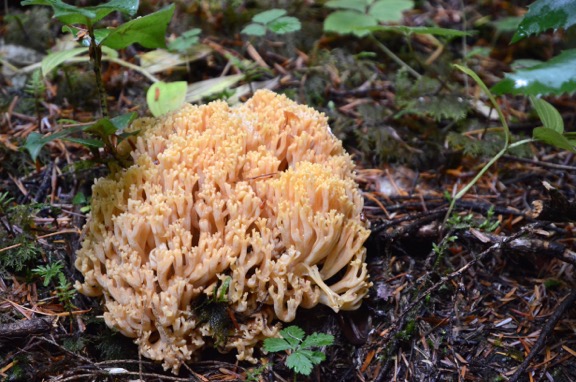
The group started together but soon split up with the most athletic taking the mile-long path all the way up the hill. I lingered in the dense forest and eventually made it up to the cemetery, shooting photos along the way. I had dutifully brought along my tripod but soon got tired of using it. On the way back down to the dock, I took my time and shot a lot of photos of mushrooms, using my iPhone for most of them.
Nothing beats my iPhone for taking shots of tiny mushrooms on the forest floor from only inches away.
I saw Jeffrey coming back for us while I was still quite a way from the dock. I hurried without running. He said he’d check in every half hour, but I was hoping I wouldn’t have to wait. I didn’t. When I got there, Jeff and Ilene were already on board. The others — Betsy, Al, and John — had gone all the way up to the top of the hill and would catch the next ride. (Christine and Joan had stayed behind.)
The water had gotten choppy and although it wasn’t rough enough to rock the David B, it was enough to have it swinging back and forth at anchor. I sat at the table in the Galley with Ilene to work on my photos while Christine worked on making croissant dough. Betsy soon joined us. We’d have a new show and tell the next day on our way back to Bellingham and I was hoping to have something more interesting to show.
Dinner was halibut cheeks with a cream sauce and veggies. Yum.
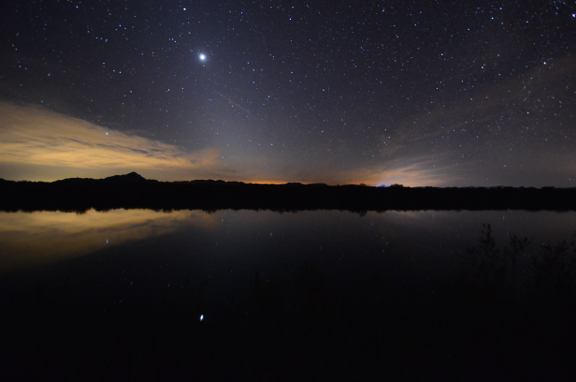
John mentioned that it might be possible to see the aurora that night. He’d gotten a text from a friend. But it was cloudy and rain was in the forecast. It was agreed that if either Jeffrey or Christine saw the aurora on their overnight watches — they walk the ship several times a night — they’d wake us up.
I slept badly. The swinging of the ship made weird noises when the anchor chain hit the forward port side of the ship. I heard footsteps overhead and thought I heard voices. I kept waiting for someone to come to the door to tell me the aurora was visible. Finally, at about 4 AM, I gave up trying to sleep and spent time reading instead.
Day 4
As usual, I was the first passenger in the galley that morning, making my appearance at about a quarter past 6. As usual, the coffee was ready. If there had been an aurora event to see, the clouds had hidden it. As someone said later in the day, the trip had been so perfect that the aurora was the only thing that could have made it better.
We were working on images in the saloon when Christine brought out a tray of her croissants. Plain, chocolate, cinnamon, and pepper jelly. Fortunately, they were small. I tried one of each and then had seconds of the ones I really liked.
Breakfast came a little later: cheesy grits with thick bacon, yogurt, granola, and fruit. I ate too much grits.
By that time, Christine and Jeffrey had pulled up the anchor and we were under way, headed to our next stop, Jones Island. The island, which is just off the southwest corner of Orcas Island, is a state park with several small bays, campsites, shelters, and pit toilets. I bet it’s packed on summer weekends. But that day it was nearly deserted, with no one in sight where Jeffrey parked on the south side. We all went ashore for a final photo outing. I purposely left my tripod behind, tired of lugging it around.
We split up quickly. I chose a trail that wound around the west side of the island, hugging the top of a bluff for much of the way. I spotted (and photographed) three deer in three separate spots. I eventually wound up at another camping area that I mistakenly thought was on the north side of the island. It wasn’t until I took the trail that I thought would take me back to my starting place and wound up someplace completely different that I realized I’d only gone one quarter of the way around the island before taking the new trail.
Did I mention that I like to photograph textures? This was part of a tree that leaned over the trail. John later said he must have spent an hour at that same tree.

Al had suggested contrast as a theme and I thought this was a good example. It’s also a reminder that autumn is on its way.
I found Al and Ilene at the camping area on the north side of the island. I walked back with them for a while, pointing out some of the more attractive mushrooms I spotted along the way. I’m not sure if Al was just being polite but he seemed genuinely interested in some of the ones I pointed out.
We crossed from north to south on the main ADA-compliant gravel trail. Back at the starting point, we started to regroup. A while later, we were on our way back to the David B in the skiff.
Back on the boat, we had enough time to edit images and have lunch before our final critique. My new photos were the ones above: whale tail, flower, trees, gnarly wood, contrasting leaves. They didn’t have many comments to improve any of them.
They had a Canon photo printer with them and offered to print one enlargement for each of us. I chose the trees. The print came out great but with all my wall space filled at home — I have a lot of windows — I’m not sure where I’ll hang it.
Another Goodbye
It was slow going back to Bellingham. We were fighting wind and a 2 knot current — a big deal when you cruise at just 6 knots. But we arrived right on time at 5 PM. By that time, we’d all packed and exchanged cards. I suggested that Jeffrey and Christine borrow my home for a week or so during the winter while I was gone; they could get some skiing in while my house sitter took a break. John was interested in a photo houseboat excursion on Lake Powell and I hoped he’d contact me for tips and advice.
There was a round of hugs as Jeffrey helped us get our luggage off the boat. Then I was headed back up the dock to my car, pulling my wheelie bags behind me, amazed that the weekend had gone so fast.


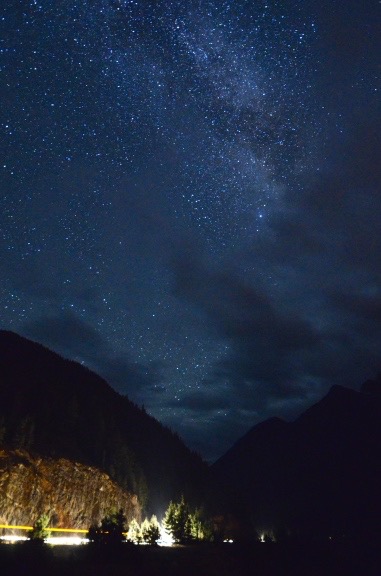

 Last spring, I shot one of what I consider
  I started doing research. I knew it wasn’t the lenses I was using — this particular image was shot with my
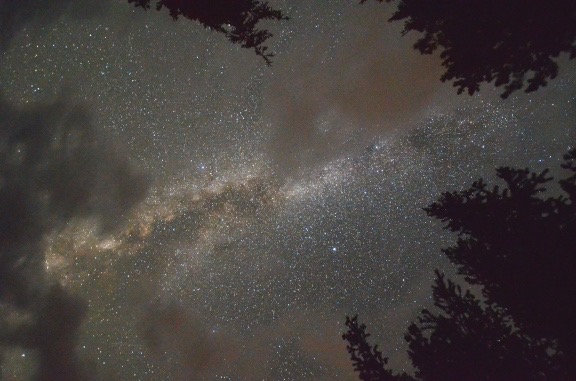
 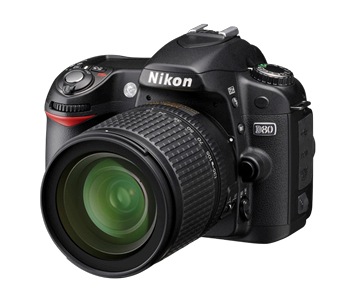 Then I started thinking more about the camera. I knew that my
  I heard about the Nikon D7000 in, of all places,
  In a fit of crazy shopping mania, I also ordered the