How I spent yesterday morning.
At 5 AM yesterday morning, I was at Wickenburg Airport (E25), filling two 5.5-gallon plastic fuel cans with 100LL. I had already topped off the helicopter’s tanks and it was sitting on the ramp, waiting for me in the predawn darkness. I was scheduled to do a wildlife survey in northern Arizona at 6:30. I’d have to pick up my passenger at Williams, AZ (KCMR), an hour away by helicopter. There was no fuel at Williams, and the closest fuel stop to Williams and our survey area was 20 NM north at Valle (40G). The FBO didn’t open until 8 AM, so I wouldn’t be able to get fuel before then. The survey area was 40 NM from fuel at Valle. I wanted my client to get as much air time as possible before our first refueling stop, so I figured I’d put the 11 gallons of 100LL that I carried with me into the tanks when I arrived in Williams.
So that explains why I was at the self-serve island, filling two plastic gas cans before dawn.
A while later, I was airborne, heading north to Williams. The two gas cans were strapped into the back passenger seats. They were good cans and wouldn’t leak on my leather seats. On board was an overnight bag, in case the job went two days, a 6-pack cooler full of bottled water, and the usual survival gear. I was listening to Steely Dan on my iPod as the sun rose at my 2 o’clock position. Moments later, I crossed the ridge east of Antelope Peak, clearing it by a mere 100 feet. From there, I sped north at 110 knots airspeed to get to Williams as quickly as possible.
At Williams, AZ
I had a tail wind and the wind was blowing pretty good at Williams. 210 at 9 gusting to 18 is what the AWOS reported. There was no one in the pattern. There never is at Williams. I made all my calls, then came around from the north to land into the wind on the big, empty ramp.
The terminal, which is very nice but completely underutilized, was unlocked. “Out of Service” signs appeared on both restrooms and the water fountain. I peeked into a stall in the Ladies room. There was water in the toilet bowl. That meant it would flush, even if it didn’t refill. I had to go so I took my chances. It worked fine. That made me wonder why the signs were there.
I was topping off the tanks with those two cans of fuel when my passenger arrived. He showed me maps and we made a plan. The main part of the job was to fly down the side of a 1,000-foot cliff face, 50 to 200 feet off the top, depending on where the rock ledges were. The cliff ran north to south. The wind was coming out of the south. Although my client suggested starting from the south, I pointed out that if we started from the north, the cliff face would be on his side of the aircraft and I’d be able to fly into the wind. That would make things easier all around. He agreed.
I added some oil, burning my fingers on the hot dip stick. We climbed in, I started up, and we took off, into the wind. A westerly heading put us on course for the survey area.
It was about a 30-minute flight. We chatted about this and that. My client was a youngish guy — certainly younger than me — and had spent more than 200 hours in airplanes and 20 hours in helicopters doing surveys like the one we were doing. As the morning wore on, he’d share a lot of his knowledge about raptors — specifically red-tailed hawks and golden eagles — with me.
The Survey
 Satellite view of the cliff face we flew down.
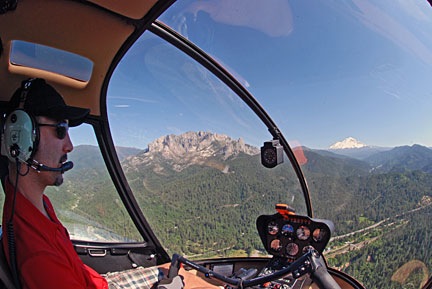
We reached the survey area and I geared my mind down from 110-knot flight through 60-knots and finally down to about 20-knots. We’d survey the cliff face at this slow speed, about 50 to 100 feet away from the rock wall.
While this sounds very dangerous, it really wasn’t bad at all. Although it had been windy at Williams, it wasn’t very windy along the cliff. That might be because the wind was coming from the southeast and the tilted mesa beyond the cliff was blocking the wind, or, more likely, it simply might not have been as windy this far west. So It wasn’t as if I had to fight the wind. Flying was easy.
There were just two of us on board, so I had plenty of power, even though I was flying at about 7,000 feet MSL. I was even able to bring the helicopter into a rock, solid out-of-ground-effect hover a few times as needed.
Best of all, if I had any kind of problem — loss of tail rotor effectiveness (LTE), settling with power, engine failure — I could easily build speed by pulling away from the cliff face to my right, where a huge, open, flat valley offered unlimited landing zones at least 500 feet below us.
Frankly, I couldn’t have asked for a better setup for this kind of work. It gave me an opportunity to practice simple flying skills — especially OGE hovering and sideways flight — without having to battle the wind or worry about escape routes.
It took at least an hour to travel down the cliff face from north to south. There was a radar dome at the very south end and we could clearly hear it in our headsets, the closer we got to it. By the time we were within 1/4 mile, the sound was very annoying. I dropped beneath it to round the end of the mesa and it silenced. I realized that this was what “below the radar” really meant.
On the other side, we followed the edge of the mesa, which wasn’t nearly as well defined, north. Again, there wasn’t much wind. There also wasn’t much wildlife to survey. We popped over the top of the mesa and began following small canyons on its east side. We were looking for raptor nests. We’d found some on the cliff face, but they could also be in tall trees.
The mesa-top stuff was low-level — probably 50 to 100 feet AGL — at 30 to 60 knots airspeed. This is considerably more dangerous than the cliff face work we did earlier. It would be difficult, if not impossible, to recover from a settling with power or engine failure incident at that low airspeed/altitude combination. One of the reasons I got the job to work for this client is that I was willing to do this kind of flying. The first company they called — a flight school — refused to let its pilots fly like this. I’m willing to take this risk, so their loss is my gain.
At one point, I landed in a wide canyon so I could strip off my outer shirt. It was getting hot in the cockpit, flying so slowly with the sun shining in. We also dipped in the cooler for cold water. I didn’t bother shutting down. It was a 5 minute break and we got right back to business when we were done.
We’d flown for 2 hours from Williams when I decided it was time to go back for fuel. We traced a route northward to the edge of the survey area, then cut east to Valle. I used my GPS to pick the most direct route. There wasn’t much of interest along the way. Northern Arizona has lots of high desert plateau areas that are covered with dried grasses and a sprinkling of trees.
It took about 25 miles to get to Valle. We had a tail wind.
At Valle
Valle Airport is about 25 miles south of the Grand Canyon. I won’t pretend to know its history. I do know, however, that it’s home of the Planes of Fame Museum, which is an excellent little warbird museum. And I know that the lobby of the airport terminal is absolutely crammed with antique cars and trucks in museum quality condition.
And there were no “Out of Service” signs on the rest rooms.
The FBO guy filled the helicopter tanks and the two fuel cans. The idea with the cans was that if I flew too long on the survey and we couldn’t make it all the way back to Valle to get fuel, I could always land out in the desert, shut down, and add the 11 gallons. That would get me another 40 minutes of flight time, which was enough to reach any number of fueling locations.
I paid for the fuel and we went back outside. The FBO guy had managed to drench the fuel cans with fuel, so I had to dry them off and close them tightly before I could load them back in. I put shop towels under them to protect the seats. Still, one of them leaked a tiny bit during the flight that followed — not enough to do any damage, but enough for me to catch the occasional smell of 100LL.
We headed west again. It took nearly 35 minutes to reach the survey area. We had a head wind.
More Survey Stuff and the Flight Home
We spent the next two hours inching our way along the same cliff face. The light was better now and we spotted another nest. We also did another nearby cliff face and spent a bunch of time zigzagging along the mesa top. We found three more nests up there. The wind had also picked up, so the flying was a bit more challenging. But I’ve flown worse.
Then we headed south to check another area. We found an active prairie dog village there.
And then we were done.
I dropped my passenger off without shutting down. It was 85 NM back to Wickenburg from that point and my goal was to get there without having to detour for fuel or stop to tap into that 11 gallons on board. I bee-lined it, cruising at my best range speed of 100 knots.
For a while, as I flew over empty desert, I thought I might not make it. I considered the kind of place I could land and refuel without bothering anyone. There was no airport on or near my flight path. There wasn’t much of anything other than small mountain ranges, canyons, and rocky outcroppings. I passed over only 3 paved roads.
Then I was 15 miles north of Wickenburg, with about 8 gallons of fuel on board. No problem.
I landed and shut down. It was 95°F on the ramp. I put the helicopter away.
I’d flown 6.5 revenue hours and had learned a hell of a lot about birds.